An explanation of what I'm trying to do by writing this up
When I started in on this project, I was a complete electronics newbie. I had no memory of holding a soldering iron. (Though as soon as that rosin core got hot, I recognized the smell. I'm pretty sure I must have soldered as a kid or in a past life or something.) I made...a number of mistakes as I built my first keyboard, but in the end I have a fully working keyboard. I'm attempting to recount, from memory, everything I did. Especially everything I did wrong. If you know what you're doing, you probably laughed or cried a fair bit as you read part 1 of this writeup. If you don't know what you're doing, it's my hope that this writeup shows you just how easy it is to build something that you might otherwise consider out of reach.
Wiring up the left hand side for testing
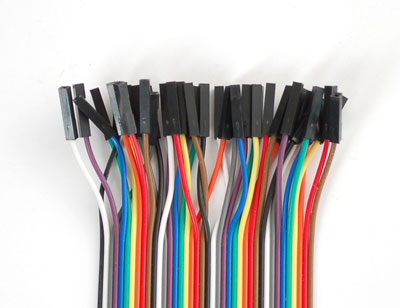
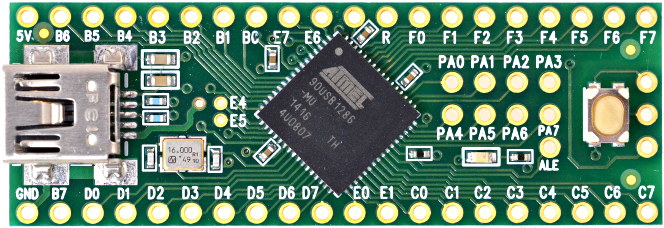
As I finished off Part 1 yesterday, I'd just managed to get the matrix on the left hand side of the keyboard wired up. From there, I wired up some temporary leads to the rows and columns on the left side. I used adapted breadboard wires from Adafruit. These have the advantage of plugging directly into the pins on the Teensy++ microcontroller. If I was working from a PCB, this wouldn't be necessary, but, since I didn't have a PCB to work from I was doing this freehand.
Once I got the rows and columns connected to the Teensy, I found some bad solder joints. I used the solder sucker to undo my bad joints and redid them.
Weird interference issues
Even once I'd debugged the bad solder joints, I was still seeing...weird behavior. Some areas of the keyboard weren't generating keystrokes. My first assumption was that I just had a few bad solder joints in a row. So I redid them. That didn't really help. Sometimes, it changed the failures a bit, but it didn't actually fix things. "I know what this is! I must have toasted some of the diodes by shorting or melting them during some of my ham-fisted soldering." So I replaced the diodes. Nope.
I unplugged the keyboard from the Teensy and started poking around with the multimeter. I couldn't find anything wrong at all. I went back and tested the "bad" diodes with the multimeter (like I should have done in the first place). They were all fine.
I plugged the left hand back into the Teensy. A different region of the keyboard was now misbehaving. Finally, I realized that certain leads from the matrix to the Teensy were misbehaving when they were plugged in next to each other. What was going on is likely obvious to anyone who understands electricity. My assumption is *mumble* *mumble* interference *mumble* shoddy wiring *mumble*. Rejiggering the wires made the problem go away. Not exactly a shining example of root cause analysis, I know.
At this point, it was time to try to wire the two halves of the keyboard together. I just needed to find a 13 wire cable.
Explanation of my keyboard matrix
13 wires, you ask?
Yes. 13 wires. On my wiring of the ErgoDox shells, I have 5 rows of up to 8 columns.
Normal keyboards are typically wired in something like a 6x18 matrix. Because the ErgoDox is a split layout, it's effectively wired as two separate mini-keyboards. The "real" ErgoDox design sticks an IO Expander on one of the hands' PCB so it can be connected to the other one by an 1/8 inch headphone-style cable. That's slightly more advanced than I'm capable of at this point, so I went for the hacky solution - just back-hauling the entire matrix from the left hand over to the right hand side where the Teensy lives.
There was just one small problem. Finding a 13 wire cable.
Trying to find a 13 conductor cable
An 8 connector cable is no problem. Easy to find. You can even go up a bit from there. But try as I might, I couldn't find a reasonable cable with enough wires for me. Then I hit upon an idea.
HDMI!
Big, thick, heavy HDMI cables. They have lots of pins, right? And lots of conductors inside. A quick check of wikipedia confirmed that there were enough wires inside for me. I briefly looked at adding HDMI ports to each side of the keyboard, but couldn't find female HDMI ports with suitable solderable headers. (They're generally fiddly little surface mount components designed to be placed and soldered by a machine, rather than a 30-something just learning basic soldering technique.)
So I pulled out my wire cutters and *snip*, I had a 13+ connector cable that I could solder to both sides of my keyboard.
In the end, I actually soldered the matrix on the left hand side of the keyboard directly to the formerly-HDMI cable. On the righthand side, I soldered each wire of the cable to a strand of the breadboard patch cable I bought from Adafruit. (The female ends on each strand of the patch cables comfortably seats one pin from the Teensy and means I don't have to mess around much when I realize I've screwed up and need to rewire things.)
I connected both halves of my keyboard to the Teensy and plugged the Teensy into my desktop machine. I hit some keys on the right hand. Everything looked fine. I hit some keys on the left side. And...nothing. Nothing at all.
All wires are not the same
It turns out that HDMI cables are made of twisted pairs of various gauges of wires. That fail for this application in exactly the same way as my own twisted rats' nest of cabling did.
In the end, I took some of the jumper wire I got from Adafruit and just used it as a ribbon cable. I tried chaining it, so I could have a 20" cable rather than an 8" cable, but things started misbehaving.
I threaded the jumper cable from the left hand to the right and got it connected to the Teensy. What I had at this point wasn't ideal, but it did work.
Time to put together the keyboard
It was time for final assembly. That sounded so nice. "final". Ha ha ha. No. At a guess, I ended up taking the keyboard shell apart and putting it back together about 20 times after this point.
So, I grabbed the back halves of the keyboard shell and carefully aligned them on top of the front halves. I grabbed some screws I had lying about and....they didn't fit. The screw heads were just a little bit too big to fit in the screw holes printed into the back shell of the ErgoDox.
In Part 1, I described the SLS (Selective Laser Sintering) process Shapeways used to 3D print my keyboard shell. What I ended up with is just white plastic -- It's fairly easy to customize. In this case, I started my customization by picking up my Leatherman and starting to carve out the edges of the screw holes one at a time. This technique was good enough to get the right hand side of the keyboard fully put together. During my initial final assembly, I managed to over-tighten one of the screws causing the plastic on the bottom side of the case to snap, leaving me down one screw hole. Thankfully, Dox (and/or his co-conspirators) nicely over-provisioned the keyboard shell with screws. Being down one screw isn't a significant hardship.
I flipped the keyboard over and connected it up to my desktop and started testing each of the keys....and found that I had a few new key failures. I unscrewed all the screws I'd just managed to tighten and set to work with the multimeter and soldering iron. Mostly, it seems I managed to stress the solder joints connecting the column wires to the keyswitches. A little bit of work with the solder sucker and soldering iron and I was ready for reassembly. I managed to repeat this process a few times. I'm now...rather better at freehand solder joints than I was when I started this project. None of this would have been an issue with a PCB to mount my keyswitches in.
Now that the right hand was behaving, I was ready to screw the left side together. My screws still didn't fit in the holes I needed to sink them into.
The correct solution would have been to wait until the next morning and walk down to the hardware store and buy properly sized screws. As you can tell from what I've already written, I haven't exactly done everything...correctly.
Rather than whittle out the screw holes on the left side, I hit upon a technique that seemed to work for me, but is probably quite dangerous and prone to catastrophe. Kids, don't try this at home until and unless an expert weighs in and says I'm just being overly dramatic.
The shell of my keyboard is made from plastic. Sure, it's not injection-molded like most plastic you'll find in a commercial product, but it has most of the properties of regular plastic. I already described how it snaps when it's subjected to too much stress. It also melts when it gets hot. Perhaps you see where I'm going?
I carefully aligned the back shell of the left hand on top of the front shell. I picked up one of my slightly-too-big screws. I placed the screw in the hole I wanted to secure. It did not seat itself properly because the screw head had a larger diameter than the hole I intended it to fill. I turned the temperature of my soldering iron way up. (As I said in the previous paragraph: Kids, don't try this at home.) I rested the tip of the soldering iron on the screw I hoped to sink. I applied a small amount of pressure with the soldering iron. As it became warm, the screw began to sink into the plastic. As it became warm, the plastic began to emit a noxious odor. When the screw appeared to be properly seated, I removed the soldering iron. This seemed to work quite well and I used the same technique for the remainder of the screws.
I can't press the reset button
I think I mentioned earlier that the way one uploads new firmware to the Teensy is by tapping a little black reset button.
That button drops the Teensy into upload mode so you can blow new firmware into its tiny little brain. When you're using a Teensy on a breadboard, this is nice and easy. You can use a finger or a small screwdriver or a tweezer or just about anything to tap that little black button. When it's sealed away inside your keyboard, it's a little bit harder to press. I really, really, really didn't want to have to disassemble my keyboard every time I wanted to reprogram it. So I took advantage of one of the properties of plastic I've already written about. I did something that would probably get me kicked out of electronics class, especially if it's not done in a well ventilated area.
One should never plunge one's soldering iron into plastic. One should never then hold one's soldering iron inside a piece of plastic and slowly melt out a groove of plastic. When one is finished doing things one should never do, one should carefully clean one's soldering iron while it's still hot.
That completed, I could now easily tap the Teensy's reset button with the keyboard fully assembled.
Time to switch to the production firmware!
I carefully tapped each key on my keyboard. Finally, every key registered. Each key only registered once. I was ready to switch the Humble Hacker firmware from "matrix discovery mode" to keyboard mode. That way, rather than each key telling me its coordinates in the matrix, it would instead, you know, generate a keystroke. I'm told this is a desirable property in a keyboard.
Keys aren't registering. WTF?
I realize I should step back a bit and describe the firmware build environment, at least a little bit.
Getting the keyboard firmware built was fairly straightforward, though it did involve a bit of cobbling things together. The Humble Hacker firmware seemed to be the most flexible option for "new keyboard, new matrix" (as opposed to "upgrade an old keyboard"), though there were a number of other options available. At some point, the author broke apart a single "keyboard" repository into a set of repositories - "firmware", "hardware", "remapper" and "kspec". I actually had the most luck following the instructions from the "keyboard" repository which is marked as "DEAD".
In addition to the Humble Hacker source, I needed to install the Teensy Loader in order to blow firmware into the Teensy.
To build that firmware, I needed a crosscompiler toolchain. The last time I needed a cross-compiler toolchain, I had to commit unspeakable acts involving multiple bootstrapping builds of gcc, insane sets of shell scripts and a summoning grid. It was bad enough that I ended up just installing a compiler on a Nokia N800 and building things there.
Thankfully, things are easier these days.
I downloaded an installable cross-compiler toolchain. It took about 10 minutes. No lurking horrors needed to be placated with the offering of a child-to-be-born. No contracts in blood. No bootstrap compiler. Not even a shell script.
I recall a little bit of futzing around to try to get the kspec tool to build from the Humble Hacker repository. In the end I just used a prebuilt version.
So, back to the keyboard build-out.
I turned off the "matrix discovery mode" in the humble hacker firmware. I did the bare minimum I needed to get the "Q" key to print a "Q" on screen. I rebuilt the firmware, tapped the little black button on the Teensy with a screwdriver and flashed the new firmware.
Ready for glory, I tapped "Q" and...nothing.
I reflashed the firmware and tried again. Nothing.
I turned matrix discovery mode back on. Everything was great.
I reflashed the firmware and tried again. Nothing.
UTSL
I opened up the source to the Humble Hacker firmware and started reading code. Apparently, it's more common to wire your diodes on the columns, rather than the rows.
Oops.
At this point, I was pretty good at rewiring the keyboard. I was also pretty sick of rewiring the keyboard. But there was an easier way.
Lie to the firmware
Why yes, Mr. Firmware. My keyboard does have 10 columns and 14 rows. (Astute readers will note that doesn't jibe very well with my claim of an a 5x8 matrix on each hand. It turned out to be a little bit easier to give each hand 5x7 to itself and then to double up on one "row".)
Success.
My "Q" registered just fine.
I filled in more of the kspec matrix.
Keyboard:Doxy
Matrix:
/*  F4      F3      F7      F5      F6      D4      D3      D2      D1      D0                  */
/*  0       1       2       3       4       5       6       7       8       9                   */
Row:  EQUAL   TAB     CAPS    LSHIFT  BLQ     --      --      RALT    PGUP    PGDN      /*  0  C7 */
Row:  1       Q       A       Z       LBRKT   --      --      --      --      --        /*  1  C3 */
Row:  2       W       S       X       RBRKT   --      --      --      --      --        /*  2  C4 */
Row:  3       E       D       C       LFING1  --      --      --      --      --        /*  3  C6 */
Row:  4       R       F       V       LFING2  --      --      --      --      --        /*  4  C5 */
Row:  5       T       G       B       BKSP    --      --      --      --      --        /*  5  C1 */
Row:  HOME    LIDX2   LIDX3   LCTRL   DELETE  --      --      --      --      --        /*  6  C0 */
Row:  --      --      LORDER  LGRN2   LFUNC   --      --      --      --      --        /*  6  C2 */
Row:  --      --      --      --      --      RIDX1   RIDX2   RIDX3   RCTRL   ENTER     /*  7  B1 */
Row:  --      --      --      --      --      6       Y       H       N       SPACE     /*  8  B2 */
Row:  --      --      --      --      --      7       U       J       M       LARROW    /*  9  B4 */
Row:  --      --      --      --      --      8       I       K       COMMA   DARROW    /*  10 B3 */
Row:  --      --      --      --      --      9       O       L       PERIOD  UARROW    /*  11 B5 */
Row:  --      --      --      --      --      0       P       SEMI    SLASH   RARROW    /*  12 B7 */
Row:  --      --      --      --      --      MINUS   BSLASH  QUOTE   RSHIFT  INS       /*  13 B0 */
/*       0   1   2   3   4   5   6   7   8   9   */
ColPins:PF4 PF3 PF7 PF5 PF6 PD4 PD3 PD2 PD1 PD0
/*       0   1   2   3   4   5   6   7   8   9   10  11  12  13  14 */
RowPins:PC7 PC3 PC4 PC6 PC5 PC1 PC0 PC2 PB1 PB2 PB4 PB3 PB5 PB7 PB0
I filled in the matrix-to-keys table. I'll spare you the bulk of that table, but to give you the flavor of things, it looks like this:
  Key:Q Map:q_and_Q                                    tl:"Q"
Key:W Map:w_and_W                                    tl:"W"
Key:E Map:e_and_E                                    tl:"E"
Key:R Map:r_and_R                                    tl:"R"
Key:T Map:t_and_T                                    tl:"T"
Key:Y Map:y_and_Y                                    tl:"Y"
The Humble Hacker firmware has support for multiple (toggleable) keyboard layers. You can do just about anything you want. Native Dvorak keyboard? No problem. Native Colemak keyboard? Sure thing. Design your own. You can do that if you want. You can't reprogram the keyboard without installing a firmware update, but there's no reason you couldn't write firmware that could do that.
Keycaps I ordered from WASD
Knowing (hoping) that I would eventually have a keyboard I needed to type on, I had ordered a set of keycaps from WASD Keyboards earlier in the year. I'd ordered, basically, "one keyboard" of keys.
Keycap shapes
I set about placing the right keycaps on the right keys. Just click em in place, right? Not so much. If you look at most modern keyboards (other than laptop or ultra-thin keyboards), you'll see that the keys have a pleasing sculpted shape. Each row has its own shape.
The ErgoDox shape isn't exactly the same as your typical desktop keyboard. Nor does it have all the same keys. It needs a couple weird-shaped vertical keys and a whole slew of slightly-wider-than-normal keys. Once I got a full set of keys on the keyboard, it felt...weird. The shapes just didn't fit.
Now, where have I seen this layout before?
I hadn't payed incredibly close attention to the layout of the ErgoDox - It had some properties I really cared about (like keys aligned in columns and clusters of keys designed to be pressed with your thumbs). Past that, it was just the first thing that looked even vaguely plausible.
Once I actually thought about it, I realized where I'd seen a layout like that before. It was, in fact, glaringly obvious. I just hadn't realized how glaringly obvious it was.
The ErgoDox Keyboard
The Kinesis Contoured Keyboard
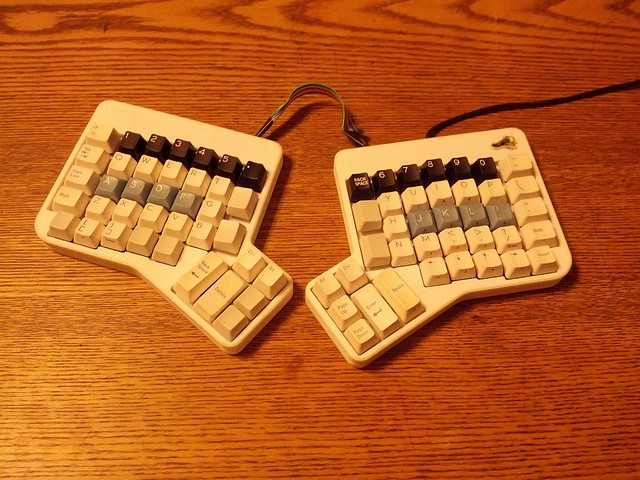
It just so happened that I had an old, dead Kinesis lying around. (Everybody does, right?) I harvested its keycaps and started pulling the keys I'd bought from WASD off of the ErgoDox. As I did so, I managed to yank one of the keyswitches up. After a small detour to the soldering station, I was back in business. (While I had the keyboard open, I locked down most of the keys by painting the edges of the keyswitches with superglue.)I was rather more careful as I pulled the remaining keycaps. I'd been using my fingers for the first few.
After the accident, I switched to a key-puller. Yep, there's a specialized tool for pulling keys off a keyboard. A basic key-puller looks like this:
That's what I started with. As I continued, I managed to dislodge another few keys, so I dug out a higher-end key-puller that WASD had sent me free with my keycap order:
Finally, the working keyboard

Thanksgiving
I spent Thanksgiving in northern Virginia with family. I'd brought along my new keyboard. TSA at Logan were....curious about my keyboard. And surprised I don't work at MIT. But totally comfortable with weird hardware with lots of bad solder joints.
Shortly after getting to Virginia, I noticed that my "A" key was frequently generating two "A" characters each time I tapped it. I wasn't 100% sure what was wrong, but based on past experience, I was willing to go with my gut. I would have been willing to bet money that it was a bad solder joint.
My father-in-law was quite accommodating and I soon found myself at the kitchen table warming up his soldering rig.
Five minutes later, I had an A key that generated only a single "A".
All told, It took me nearly 40 hours of work
How do I know how long this took, you ask? I spent a number of years in consulting and am careful to run a timer for everything I do so I can charge appropriately. No, wait. That's not it. I've never been much good at time accounting. I didn't think very hard about how long it was taking me to build my first keyboard. I didn't really want to think very hard about it. I sort of wish I didn't know how long it took. But I do.
Remember how, back in Part 1, I said that as I sat down for my first soldering experiment I started the pilot of Community on Hulu? Well, as I was futzing with the firmware, I ran out of Community to watch. That'd be 71 half-hour episodes. To have _something_ on as I was finishing up, I put on the pilot of Modern Family. I...did not enjoy that and will not be repeating the mistake.
So, do I like it?
Yes. It's not quite my ideal keyboard or keyboard layout and is different enough than everything I've ever spent time typing on that I'm still getting somewhat fatigued using it for more than a short period if time, but I'm getting better.
It's nicely portable. I quite like being able to fold it in half and tuck it away for transport.
I know how it works. A friend commented that this is one keyboard I'd hate to spill something into. Thinking about it, I realized that I'm actually less worried about something bad happening to this keyboard. I'm confident that, given minimal (and fairly ubiquitous) tools I could repair it without too much effort.
Where am I headed next?
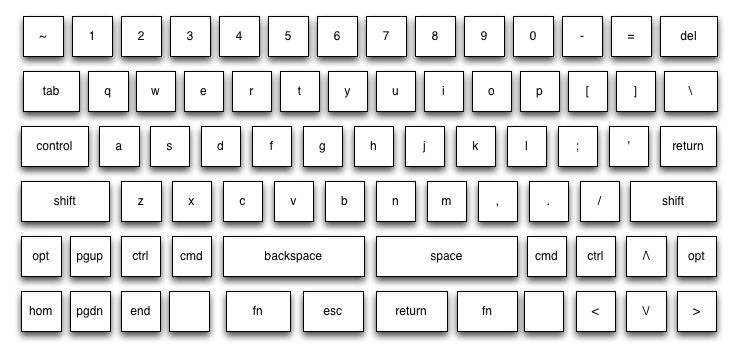
I have...ideas for some novel keyboard designs that I'd like to try out. When I'm back from holiday travel, I'm going to start in on an original design. I'm not 100% sure what I'm going to build, but it might be something with a layout like this:


